Drawing realistic faces has fascinated artists for centuries. Unlike abstract or impressionistic styles, realism in portrait drawing attempts to capture the subject as truthfully as possible, highlighting not just their physical features but also the subtle nuances that reveal personality and emotion. For many beginners, realistic drawing can feel intimidating, but with structured practice, patience, and proper understanding, anyone can develop this skill. This guide is designed to take you through every stage of portrait drawing, from foundational concepts to advanced techniques, ensuring that by the end you have a clear roadmap for mastering the art of realistic faces.
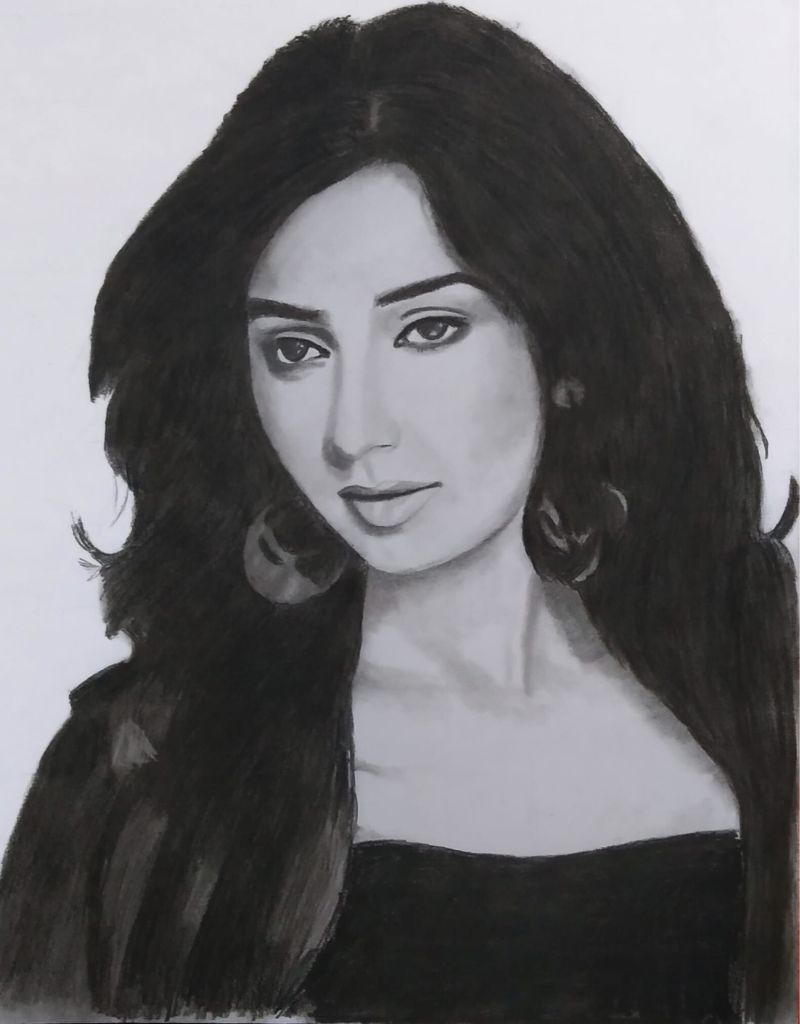
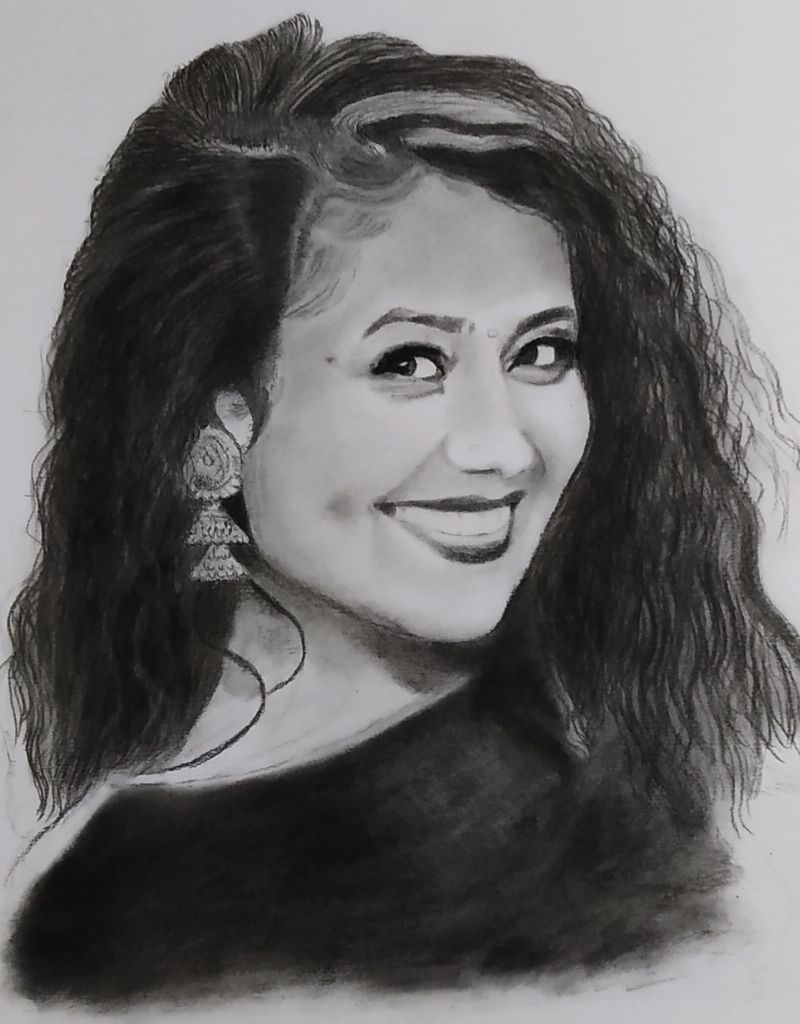
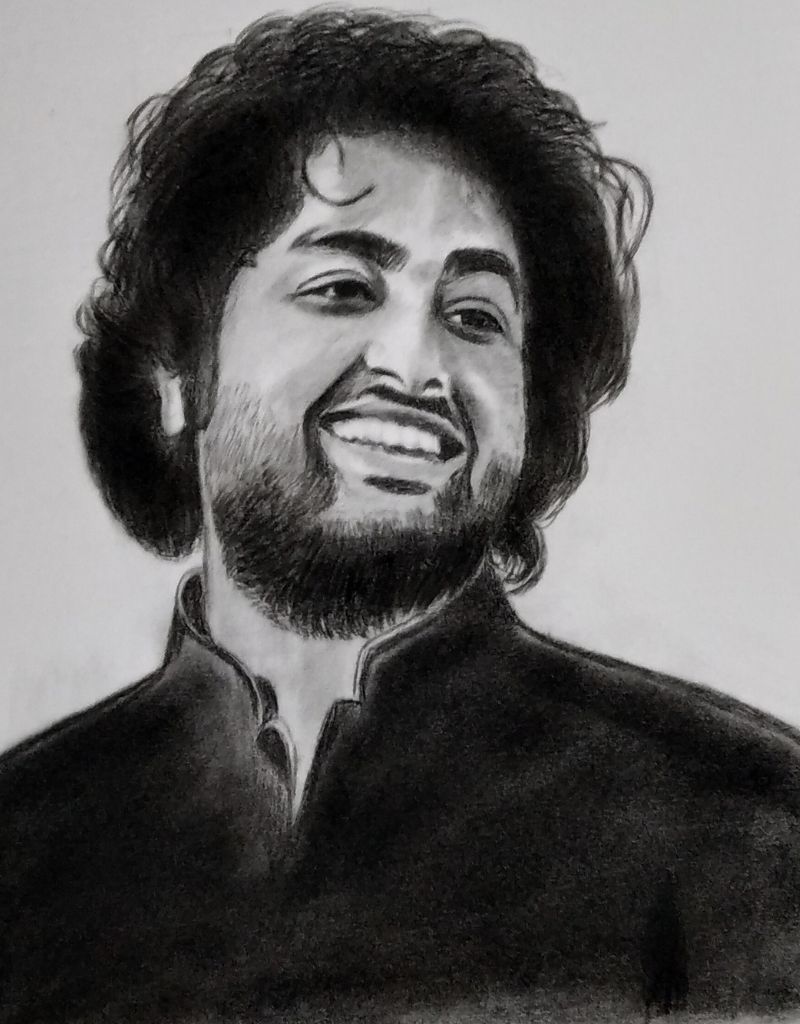
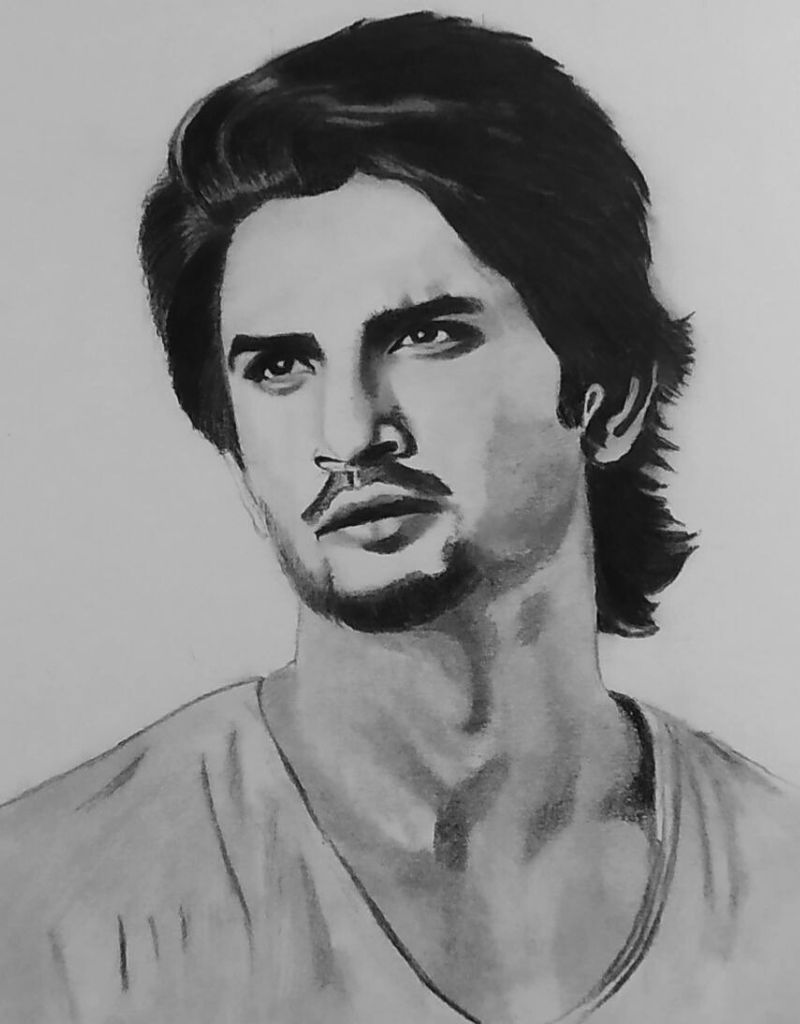
Realism requires more than technical ability—it demands observation, empathy, and a keen awareness of details. Whether you are aiming to create lifelike sketches of your loved ones, improve your artistic portfolio, or simply enjoy the meditative process of drawing, the journey is as rewarding as the result. This complete guide will cover tools, anatomy, techniques, practice strategies, and even preservation of your work, making it a comprehensive resource for artists at all levels.
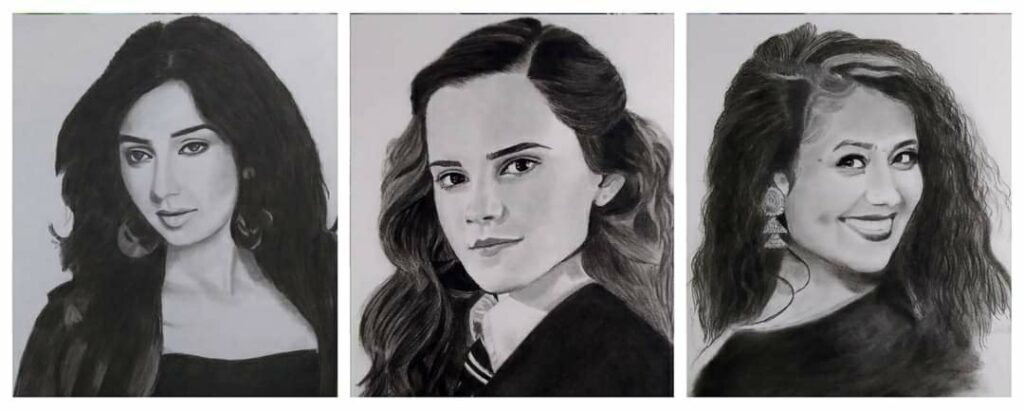
Why Pencil Portraits Are Timeless
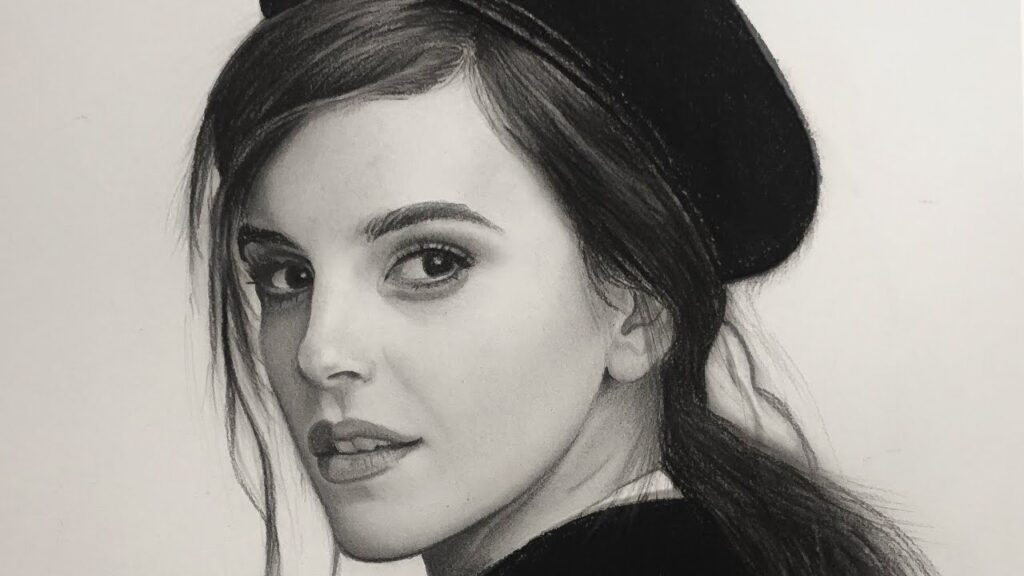
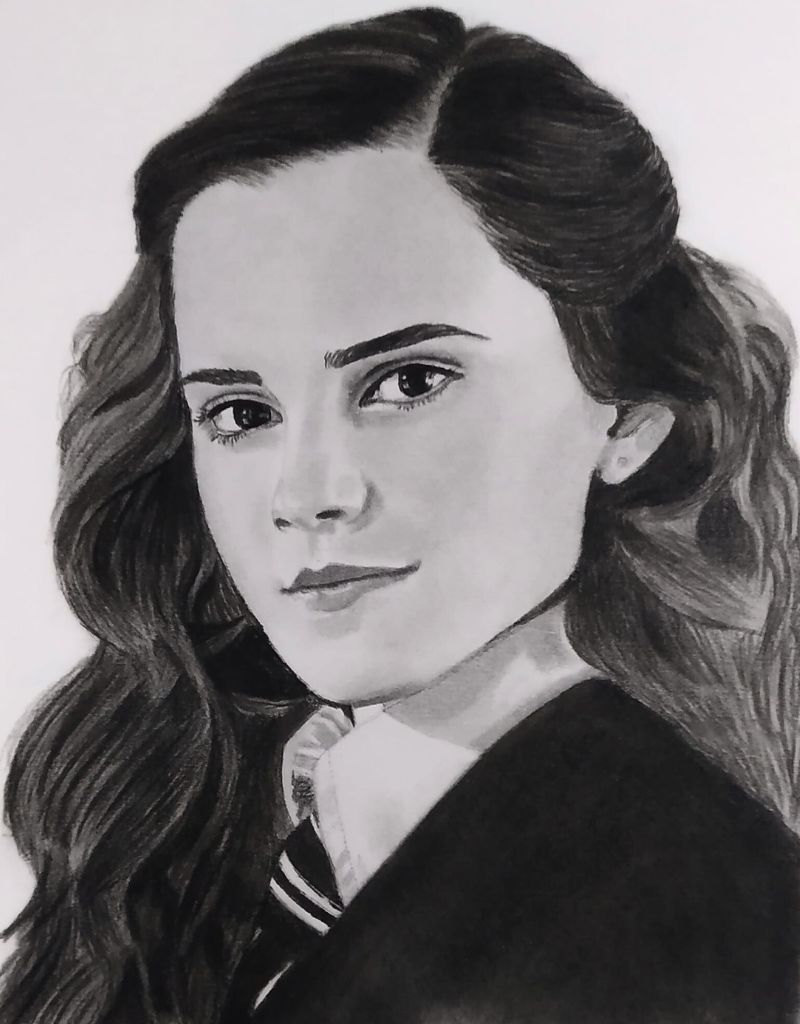
Pencil portraits have maintained their charm across centuries despite the emergence of digital art, photography, and other modern mediums. The timeless appeal comes from both their simplicity and depth. With nothing more than a pencil and paper, an artist can capture the spirit of a subject. The monochrome tones create an intimacy that color often distracts from, directing attention toward form, light, and expression.
One reason pencil portraits are timeless is accessibility. Unlike oil painting or digital rendering, which require expensive materials or software, pencils are affordable and widely available. Artists from any background can experiment with this medium without large investments.
Another reason lies in the expressive power of graphite. The wide tonal range, from delicate light grays to rich dark blacks, allows artists to build layers of depth. When handled skillfully, pencil drawings can rival the impact of high-resolution photographs, while still carrying the unique touch of the artist.
Historically, pencil sketches have been used for practice, studies, and even final works of art. Great masters such as Leonardo da Vinci and Michelangelo relied on pencil-like mediums to explore human anatomy and emotion. Today, portrait pencils remain popular not just for tradition’s sake, but because they continue to offer immediacy, control, and artistic warmth.
In a fast-paced digital era, pencil portraits remind us of patience and human connection. They stand as a bridge between artistic heritage and personal storytelling, ensuring their place as an eternal form of expression.
Benefits of Learning Realistic Portrait Drawing
The practice of realistic portrait drawing is much more than a hobby. It sharpens the mind, develops patience, and fosters deeper appreciation for human beauty. The benefits extend beyond artistic growth into mental, emotional, and even professional domains.
-
Enhanced Observation Skills – Learning to draw realistically trains you to notice details that others might miss. The tilt of an eyebrow, the curve of a lip, or the way light falls across the cheek become lessons in perception. These skills carry over into photography, design, and even everyday awareness.
-
Patience and Focus – Realistic portrait drawing cannot be rushed. It requires hours of careful shading, measuring, and adjusting. This process strengthens concentration and helps reduce stress, making it a meditative practice.
-
Improved Hand-Eye Coordination – The act of translating what you see into accurate pencil strokes enhances motor skills. Over time, your hand learns to follow your eye with precision, a benefit useful in any craft.
-
Creative Expression – Beyond accuracy, portrait drawing is about storytelling. By emphasizing certain details or choosing how to shade, artists communicate mood and emotion. This blend of technique and creativity fosters self-expression.
-
Career Opportunities – Skilled portrait artists can pursue careers in fine art, commissions, illustration, or teaching. The demand for hand-drawn portraits remains strong for personal gifts, book illustrations, and even digital adaptations.
-
Personal Satisfaction – Few feelings compare to completing a lifelike portrait. The sense of achievement, especially when capturing the likeness of a loved one, creates lasting fulfillment and confidence.
Ultimately, the benefits of portrait drawing stretch far beyond paper. They shape your mindset, expand your creative vocabulary, and connect you to centuries of artistic tradition.
Who This Guide Is For
This guide has been crafted for a wide spectrum of readers, from curious beginners to intermediate artists who wish to refine their skills.
-
Aspiring Artists – If you are just starting your artistic journey and have always admired realistic faces, this guide will provide you with the foundation you need.
-
Intermediate Learners – Those who already sketch but struggle with proportions, shading, or capturing likeness will find structured techniques and troubleshooting tips to push their art to the next level.
-
Art Students – For students pursuing formal art education, this guide consolidates concepts like anatomy, shading, and proportion, making it a helpful supplementary resource.
-
Hobbyists and Enthusiasts – Even if you don’t aim for a career in art, drawing portraits can be deeply rewarding. This guide will help hobbyists enjoy the process without the pressure of perfection.
-
Teachers and Mentors – Art instructors can use this material to introduce realism to their students, providing a systematic way to explain complex concepts.
No matter your background, this guide is for anyone who wishes to learn how to transform a blank sheet into a portrait that feels alive. The lessons can be adapted to suit your pace, style, and goals, making the journey both structured and flexible.
I. Fundamentals of Pencil Portrait Drawing
A. Understanding Realism in Portraits
Realism in portrait drawing means creating an image that looks as close as possible to the subject in real life. Unlike cartoons or stylized sketches, realism focuses on accurate proportions, true-to-life shading, and detailed textures that capture both appearance and personality. What makes a portrait “realistic” is not simply copying a photograph but recreating depth, emotion, and essence through pencil strokes.
A realistic portrait relies on three key elements:
-
Observation – The ability to notice tiny variations in light, shadow, and form. For example, the slight droop of an eyelid or the uneven edge of a lip can completely change how a face looks.
-
Patience – Unlike quick doodles, realistic portraits require hours of building up layers of shading and refining details. Rushing leads to flat, lifeless sketches.
-
Accuracy in Proportions – The human brain is very sensitive to facial errors. Even a millimeter difference in the eyes or nose can make the portrait feel “off.”
Developing realism is like training your eyes to see differently. Instead of thinking “this is an eye,” you start observing it as shapes, shadows, and highlights. With time, you begin to draw what you actually see, not what you think you see. This mindset shift is the true foundation of realistic art.
B. Essential Drawing Tools and Materials
Having the right tools does not automatically make someone an artist, but they do make the learning process smoother and more effective. Each material plays a role in creating depth, texture, and clarity in your portraits.
-
Graphite Pencils (Grades and Their Uses)
Pencils come in different grades from hard (H) to soft (B). Hard pencils like 2H–4H produce lighter, sharper lines perfect for initial sketches and fine details. Softer pencils like 2B–8B give darker, richer tones ideal for shading and shadows. A complete set allows you to shift seamlessly from delicate outlines to deep contrasts. -
Paper Types and Textures
Paper is often overlooked, but it dramatically affects the outcome. Smooth paper (Bristol, hot-press) is great for fine detail, while textured paper (cold-press, cartridge) adds grip for shading and layering. Beginners usually benefit from medium-textured paper because it balances detail and blendability. -
Erasers (Kneaded, Precision, and Regular)
Erasers aren’t just for mistakes—they are drawing tools themselves. A kneaded eraser can be shaped into a point to lift out highlights (like reflections in the eyes). A precision eraser helps refine sharp edges, while a regular eraser clears larger areas. -
Blending Tools (Tortillons, Stumps, Tissues)
To soften pencil marks and create smooth transitions, blending tools are essential. Tortillons and stumps offer controlled blending for small areas, while tissues or cotton pads are useful for larger smooth gradients, like cheeks or foreheads. -
Additional Supplies (Rulers, Sharpeners, Fixatives)
A ruler ensures correct proportions, especially in the early learning stage. Sharpeners (preferably a craft knife and sandpaper pad) help maintain fine points for detail work. Fixatives are sprays used to protect your finished drawing from smudging.
Investing in good-quality supplies not only improves the look of your portraits but also enhances your learning experience by reducing frustration.
C. Workspace and Setup
Your workspace influences both the quality of your art and your level of focus. A well-prepared environment sets the stage for consistent, comfortable practice.
-
Choosing Proper Lighting
Lighting is one of the most important aspects of portrait drawing. Natural daylight is best because it reveals true tones and soft shadows. If unavailable, use a white LED lamp placed at an angle to avoid glare. Never draw under dim or yellow light—it distorts values and strains your eyes. -
Comfortable Posture and Drawing Position
Drawing requires long hours of sitting, so maintaining posture is essential. Use a sturdy chair with back support and place your drawing surface at a slight tilt, similar to an easel, to prevent perspective distortion. Working flat on a table often causes proportions to look skewed because of the viewing angle. -
Setting Up a Distraction-Free Zone
Realistic portraits demand deep concentration. Choose a quiet space, turn off unnecessary notifications, and keep only your essential tools nearby. A clutter-free environment helps you focus on subtle details and maintain the patience realism requires.
Your workspace should feel like a creative sanctuary—somewhere you can lose yourself in the process of building depth, one pencil stroke at a time.
II. Preparing for Portrait Drawing
A. Studying Human Anatomy and Proportions
Before attempting to draw realistic faces, it is essential to understand the structure beneath the skin. Many beginners struggle with portraits because they jump straight into copying photographs without knowing how the human face is built. Anatomy gives you a foundation to place features correctly and maintain realism.
-
Basic Skull Structure
Every face is built on the skull, which defines the overall proportions. The human skull is not a perfect oval—it has subtle planes that influence how light falls on the face. The eye sockets, cheekbones, and jawline are particularly important landmarks. For example, when drawing eyes, knowing that they sit in deep sockets helps you shade them naturally instead of placing them flat on the surface. -
Understanding Facial Proportions
Artists often use guidelines to ensure balance. A common rule is that the face can be divided into three equal sections:-
Hairline to eyebrows
-
Eyebrows to the base of the nose
-
Base of the nose to the chin
Additionally, the eyes are usually one eye-width apart, and the corners of the mouth tend to align with the pupils. While real faces differ, these guidelines act as a starting framework.
-
-
The Golden Ratio in Faces
The golden ratio, approximately 1.618, has been observed in what many consider “harmonious” facial structures. Though not every face fits this ideal, studying it can help artists understand balance and symmetry. For instance, the spacing between facial features often follows this ratio. Using it as inspiration rather than a strict rule can guide you toward aesthetically pleasing proportions.
By studying anatomy and proportions, you gain the ability to go beyond “guessing” where features belong. You can confidently sketch a framework that ensures balance and structure, no matter the subject.
B. Observational Techniques
Observation is what transforms a sketch into a realistic portrait. While anatomy gives you rules, observation allows you to capture individuality—the tilt of a head, the curve of a smile, or the unique spacing of features. Training yourself to “see like an artist” is as important as mastering shading techniques.
-
How to See Like an Artist
Beginners often draw what they think a face looks like instead of what it truly is. For instance, we tend to imagine the eye as an almond shape, but in reality, it’s a complex form with eyelids, tear ducts, and shadows. To overcome this, practice viewing the face as shapes and values rather than named features. Instead of saying, “I’m drawing a nose,” think, “I’m drawing this triangle of shadow with a soft curve above it.” -
Using References and Live Models
References are essential when learning. Photographs allow you to practice at your own pace, while live models teach you about depth and shifting light. Each has advantages: photos freeze a moment in time, while live subjects help you understand three-dimensional form. Ideally, you should work with both to develop versatility. -
Practicing with Photo References
Start with high-quality photos where lighting is clear and consistent. Avoid heavily edited or filtered images because they distort natural shadows. As you improve, challenge yourself with candid photos or dramatic lighting to build confidence in different scenarios.
Observation is about slowing down. The more time you spend studying before putting pencil to paper, the more accurate and lifelike your portrait will become.
C. Sketching Guidelines
Once you understand anatomy and have practiced observation, the next step is laying down the initial framework. This stage is critical because it sets the foundation for the entire portrait. Mistakes here often cause problems later, no matter how well you shade.
-
Creating a Light Framework
Begin by sketching lightly with a hard pencil (like 2H). Draw an oval for the head, then divide it with horizontal and vertical lines to place features symmetrically. Keep your lines faint so they can be easily erased or adjusted. Think of this as building scaffolding for a structure—you won’t keep it, but it ensures stability. -
Blocking in Shapes Before Details
Instead of diving straight into eyelashes or wrinkles, block in larger shapes first. Place simple outlines for the eyes, nose, and mouth, then check proportions. From there, gradually refine shapes into more accurate forms. This prevents wasted effort on details that might later need to be erased if proportions are wrong. -
Avoiding Common Early Mistakes
Beginners often:-
Place the eyes too high on the face
-
Make the nose too small
-
Forget symmetry by focusing too much on one side
To avoid these errors, constantly step back from your drawing. Looking at your work from a distance or flipping it upside down can reveal mistakes your eyes overlooked up close.
-
Sketching guidelines don’t make your portrait stiff—they give you confidence that each feature sits where it belongs. Once proportions are correct, you can relax into the enjoyable process of adding depth, shadows, and personality.
III. Step-by-Step Process for Drawing Realistic Portraits
A. Drawing Facial Features Individually
The face is a collection of distinct features—eyes, nose, mouth, ears, and hair—that must be mastered separately before blending them into a whole. Each feature carries unique challenges, and learning them individually sharpens precision.
-
Eyes: Capturing Life and Emotion
The eyes are often described as the “windows to the soul,” and for good reason—they are the most expressive part of a portrait. Start with the almond-shaped outline, but remember the eye isn’t flat. It sits within a rounded socket, so shading the eyelids and surrounding skin is essential. The iris should never be a perfect circle; instead, it is slightly covered by the top eyelid. Add highlights carefully to give life—without them, eyes appear dull. -
Nose: Structure, Shadows, and Highlights
Unlike the eyes, the nose has no sharp outlines; it is built almost entirely from light and shadow. Begin with simple guidelines—the bridge, nostrils, and base—then use shading to define its form. Pay close attention to how light falls on the nose because even a slight mistake in shading can flatten it or make it appear crooked. -
Mouth and Lips: Volume and Expression
The lips are more than just two curves—they are three-dimensional forms with subtle creases and highlights. The upper lip is usually darker because it tilts inward, while the bottom lip catches more light. Avoid outlining lips heavily; instead, suggest them with shading to maintain realism. Expressions are conveyed strongly through the mouth, so studying slight changes is key. -
Ears: Simplifying Complex Shapes
Many artists avoid ears because they appear complicated, but they follow predictable patterns. Break them into basic forms—the outer curve (helix), the inner fold (antihelix), and the ear lobe. Focus on shading rather than line work, as ears rely on depth created by shadows. -
Hair: Texture, Flow, and Volume
Hair is not drawn strand by strand. Instead, treat it as masses that flow together. Start with large shapes to capture volume, then gradually add smaller strands to suggest texture. Pay attention to light—hair reflects highlights strongly, especially when dark. Use long, confident strokes instead of short ones to keep it natural.
Mastering each feature independently allows you to build confidence before combining them into a complete portrait.
B. Constructing the Full Face
Once you’ve practiced individual features, the next step is placing them accurately within the head structure. Symmetry and balance are crucial here, as even small errors will be noticeable.
-
Aligning Features Accurately
Begin with a light oval for the head and divide it with guidelines: a vertical line down the center and horizontal lines for the eyes, nose, and mouth. Place features lightly before refining them. Remember that not every face is perfectly symmetrical—slight natural variations add realism. -
Building Symmetry and Balance
A common mistake is perfecting one eye, then struggling to match the other. To avoid this, work on both eyes at the same time, moving back and forth. Do the same for eyebrows, cheeks, and shading. This ensures balance and prevents one side from looking inconsistent. -
Defining the Jawline and Cheekbones
These structural features give the face its shape. The jawline defines strength and proportion, while cheekbones create depth. Use subtle shading rather than harsh outlines to make them realistic. Study how light interacts with these areas—they often create natural highlights and shadows.
Constructing the full face requires patience. Think of it like building a puzzle: each piece must fit together correctly before you see the whole picture.
C. Adding Realism with Shading
Shading transforms a flat sketch into a three-dimensional portrait. It’s where the illusion of depth, softness, and lifelike presence truly comes alive.
-
Light Sources and Shadow Placement
Identify your light source before shading. Whether it’s from the left, right, or above, all shadows must remain consistent. The rule is simple: areas closer to the light are lighter, while areas farther are darker. This principle applies to every feature, from the nose to the jawline. -
Techniques: Hatching, Cross-Hatching, and Blending
-
Hatching uses parallel lines to suggest shadow.
-
Cross-hatching layers lines in different directions for deeper tones.
-
Blending softens these marks, creating smooth transitions between light and dark.
Skilled artists often combine these methods, starting with hatching for texture and finishing with blending for polish.
-
-
Gradation for Depth and Dimension
Avoid harsh jumps between light and dark; instead, create gradations—smooth transitions that mimic how light naturally falls on curved surfaces. This is especially important for cheeks, foreheads, and lips. Gradation prevents the face from looking flat or cartoonish.
Good shading is about subtlety. Often, less is more—suggesting form with gentle values rather than over-darkening.
D. Textures and Details
Realism shines through in the details. Beyond shading, adding subtle textures brings uniqueness and personality to a portrait.
-
Skin Textures and Tones
Human skin is not perfectly smooth. It has pores, subtle tonal variations, and soft imperfections. Use light, controlled pencil strokes to suggest this without overworking. Too much texture can make the face appear rough; too little can make it look unnatural. -
Wrinkles, Freckles, and Other Details
Wrinkles around the eyes, freckles across the nose, or slight scars add character. They should be drawn lightly and blended into the skin rather than standing out harshly. These details often carry emotional weight—wrinkles suggest age and wisdom, freckles add playfulness, and scars tell stories. -
Glasses, Jewelry, and Accessories
Accessories should enhance, not distract. Glasses, for example, must follow facial perspective and show subtle reflections. Jewelry can be suggested with highlights and shapes rather than full detailing. Always ensure they fit naturally within the portrait rather than feeling pasted on.
Adding textures and details requires restraint. They are the finishing touches that separate a good drawing from an extraordinary one.
IV. Advanced Techniques for Realistic Portraits
A. Capturing Likeness and Personality
One of the most challenging aspects of portrait drawing is not just creating a face that looks realistic, but one that resembles the specific individual you are drawing. This is what separates a generic portrait from a true likeness.
-
Understanding Expressions
Subtle shifts in eyebrows, the curve of the lips, or the squint of the eyes can dramatically change how someone looks. To capture likeness, study the unique way your subject expresses themselves. Do they smile with one side of their mouth higher than the other? Do their eyes crinkle when they laugh? These micro-expressions often carry more identity than the features themselves. -
Conveying Mood Through Subtle Details
Beyond accuracy, mood brings life into your portrait. Gentle shading around the eyes can suggest sadness or contemplation, while bright highlights on the cheeks can convey joy. Think of mood as the atmosphere of your drawing—it gives emotional weight to technical skill. -
Focusing on Unique Features
Every face has distinguishing traits: a slightly crooked nose, full lips, or high cheekbones. Identify these features early and emphasize them carefully. Overemphasizing can turn them into caricatures, but underplaying them results in a portrait that feels generic. Balance is key.
Capturing likeness is about observation and empathy. The more you notice the small details that make your subject unique, the more powerful your portrait becomes.
B. Photorealism Tips
Photorealism takes realism a step further, aiming to make the portrait almost indistinguishable from a photograph. While not every artist chooses this style, practicing photorealism sharpens precision and control.
-
Layering for Depth
Photorealistic portraits are rarely achieved in one pass. They require building values gradually through multiple layers. Start with light tones, then add darker values, constantly refining transitions. Layering ensures depth, making skin, hair, and fabric look natural instead of flat. -
Achieving Smooth Blends
Smooth blending is crucial for photorealism. Instead of harsh shading, use controlled strokes and blending tools to create seamless gradations. A combination of tissue, blending stumps, and kneaded erasers can create that soft skin-like finish. Avoid smudging with your fingers, as the oils can damage the paper. -
Using Contrasts to Enhance Lifelikeness
A common mistake in beginner portraits is playing it too safe—keeping values in a mid-range and avoiding dark blacks or bright whites. But true photorealism thrives on contrast. Deep shadows under the chin, sharp highlights in the eyes, and bold darks in the hair bring intensity and lifelike energy. Always push your values to the full range.
Photorealism is demanding but rewarding. Even if you don’t aim to specialize in it, practicing these techniques will strengthen your control and make your regular portraits more convincing.
C. Avoiding Common Mistakes
Every artist, beginner or advanced, faces common pitfalls in portrait drawing. Recognizing and correcting them is essential for growth.
-
Over-Blending or Over-Erasing
Over-blending can make a portrait look plastic or airbrushed, removing natural texture. Similarly, over-erasing can damage the paper and create distracting patches. The key is moderation—blend enough for smoothness but leave some texture, and erase sparingly for highlights. -
Flatness vs. Depth Issues
One of the biggest struggles in portraits is making the face look three-dimensional. Flatness happens when shading lacks gradation or when all values stay in the same range. To avoid this, focus on creating clear light sources and building smooth transitions. Imagine sculpting the face with your pencil, not just outlining it. -
Misplaced Proportions
Even the most beautiful shading can’t save a portrait if proportions are off. Eyes that are too big, a nose that’s too low, or uneven alignment immediately ruin likeness. Always check proportions during the early stages by stepping back, using a mirror, or flipping your drawing. Catching errors early is easier than correcting them later. -
Neglecting the Background
Many artists leave the background blank, but even a light suggestion of environment can enhance realism. A shaded gradient or subtle tones around the head can prevent the portrait from looking like it’s “floating” on the page.
By learning to spot these mistakes, you avoid frustration and make faster progress. Every artist makes errors—it’s how quickly you recognize and correct them that determines improvement.
V. Practice, Improvement, and Style Development
A. Building a Consistent Practice Routine
Like any skill, portrait drawing improves through consistent and mindful practice. Many beginners expect rapid progress, but mastery comes from steady repetition and reflection. A structured routine keeps motivation alive and ensures continuous growth.
-
Daily Sketch Exercises
Short, daily sketches are more effective than infrequent long sessions. Even 15–20 minutes spent sketching facial features trains your eyes and hands to work in harmony. For example, you might dedicate one day to drawing only eyes or practice shading small facial planes. These quick studies build muscle memory without overwhelming you. -
Time-Limited Studies vs. Long Sessions
Mixing quick sketches with extended studies creates balance. Time-limited exercises (5–10 minutes per sketch) sharpen speed and observation, teaching you to capture the essence of a face quickly. Long sessions, on the other hand, allow you to dive deep into detail, refining your shading and proportions. Both approaches complement each other—speed gives confidence, while depth builds refinement. -
Tracking Progress Over Time
Keep a sketchbook solely for portraits and date each entry. Over weeks and months, you’ll notice gradual improvement. Comparing older works with newer ones boosts confidence and highlights areas still needing practice. Improvement in realism often happens slowly, so visual proof keeps you motivated.
Consistency matters more than perfection. By showing up regularly, even for short sessions, you strengthen your skills naturally.
B. Learning from Masters and Modern Artists
Studying the work of other artists accelerates learning. Every master, whether from the Renaissance or today’s digital era, leaves behind lessons in technique, expression, and style.
-
Studying Famous Portrait Artists
Classical masters like Leonardo da Vinci, Rembrandt, and John Singer Sargent demonstrated timeless approaches to anatomy, light, and expression. Da Vinci’s anatomical sketches remain unmatched for structural understanding. Rembrandt’s mastery of light shows how contrast creates emotion, while Sargent’s fluid lines demonstrate efficiency. By analyzing their works, you gain insight into methods that shaped centuries of portraiture. -
Analyzing Different Artistic Styles
While realism is the focus, studying other styles—such as impressionism, abstract art, or contemporary illustration—broadens perspective. For instance, Picasso’s portraits may not be realistic, but they emphasize exaggeration and interpretation. Observing different styles teaches flexibility and helps you avoid becoming overly rigid in your approach. -
Learning from Modern Artists
Today’s portrait artists on platforms like Instagram, YouTube, and DeviantArt provide valuable demonstrations. Many share tutorials, time-lapse videos, and breakdowns of their techniques. Following them allows you to see how realism evolves with new tools and perspectives. Combining classical wisdom with modern innovation creates a richer learning journey.
Learning from others is not about copying—it’s about understanding principles and then adapting them to your voice as an artist.
C. Developing Your Unique Portrait Style
While realism focuses on accuracy, every artist eventually seeks a personal style that distinguishes their work. Style emerges gradually as you combine influences, experiment with techniques, and reflect on what excites you most.
-
Combining Realism with Creativity
Realism doesn’t mean you must copy reality exactly. You might choose to exaggerate contrasts for drama, simplify details for elegance, or emphasize certain features to highlight personality. By blending realism with creative interpretation, you develop portraits that feel uniquely yours while still grounded in truth. -
Experimenting with Abstract Elements
Incorporating abstract backgrounds, unusual compositions, or mixed media (like watercolor washes behind graphite portraits) adds originality. For example, you might draw a highly realistic face but surround it with abstract textures that express mood. These experiments push boundaries and help you discover what resonates with you. -
Listening to Your Artistic Voice
Ask yourself: What kind of portraits inspire me most? Do I enjoy drawing elderly faces full of wrinkles and stories, or young faces with smooth tones and subtle features? Do I prefer minimalistic realism or hyper-detailed photorealism? Your preferences reveal your artistic voice, guiding your unique style.
Style is not forced—it develops naturally through exploration and practice. What begins as imitation of others eventually transforms into originality when filtered through your personality and perspective.
VI. Preserving and Presenting Your Portraits
A. Fixatives and Protection Methods
Once you have completed a realistic portrait, preserving it is crucial. Pencil drawings are fragile; graphite can smudge, fade, or get damaged if not protected properly. Fixatives and other protection methods ensure your work lasts for years without losing its quality.
-
Preventing Smudges and Fading
Graphite is prone to smudging because it sits on the surface of the paper. A light spray of fixative creates a protective barrier. There are two main types: workable fixative, which allows you to continue drawing on top, and final fixative, which is used to seal a finished piece. Always spray from a distance of 12–18 inches in thin, even layers to avoid darkening the paper.In addition to fixatives, you can protect your drawing by:
-
Avoiding touching the drawing surface with bare fingers
-
Using a clean sheet of paper beneath your hand while working
-
Storing sketches in folders or sleeves immediately after completion
-
-
Safe Storage Practices
Proper storage ensures your portraits remain undamaged over time. Keep drawings in acid-free portfolios, sleeves, or folders to prevent yellowing. Avoid humid or damp areas, as moisture can warp paper and smudge graphite. Additionally, store vertically rather than stacking horizontally, which reduces pressure and accidental smudges.For valuable or sentimental works, consider archival boxes or flat storage between boards. Maintaining a cool, dry, and dark environment protects both the paper and the graphite.
B. Display and Presentation
Displaying your work transforms it from a personal achievement into a visual story others can appreciate. Presentation matters just as much as drawing skill, especially if you plan to exhibit or sell your portraits.
-
Mounting and Framing Portraits
Framing not only enhances the aesthetic appeal but also offers physical protection. Use acid-free mats to prevent contact between the drawing and glass. UV-protective glass reduces fading caused by sunlight. When choosing frames, balance simplicity and elegance—too ornate a frame can distract from the portrait itself, while too plain a frame may not highlight the art effectively.Mounting with a backing board ensures the drawing remains flat and prevents warping over time. Additionally, secure the portrait with archival tape or corner mounts rather than adhesives directly on the paper.
-
Preparing Art for Exhibitions
If you plan to exhibit, consider labeling each portrait with its title, medium, and date. Arrange your portraits thoughtfully, grouping similar styles or subjects. Ensure consistent lighting at the exhibition space to highlight shading and details effectively. For competitions or gallery submissions, always check the submission guidelines for framing and mounting requirements.
C. Sharing Your Work Online
In today’s digital era, sharing your portraits online allows for exposure, feedback, and professional opportunities. A strong online presence can even lead to commissions, collaborations, or sales.
-
Best Platforms for Portrait Artists
Platforms like Instagram, ArtStation, DeviantArt, and Behance are popular for artists. Instagram offers visibility through hashtags and reels, while ArtStation and Behance attract more serious collectors and professional audiences. YouTube is ideal if you want to share tutorials or speed-paint videos. -
Building an Online Portfolio
Creating a dedicated online portfolio website adds professionalism. Include high-resolution images, close-ups of details, and a brief description of each piece. Organize your work by theme, style, or medium to make navigation easy. A portfolio is essential if you plan to approach galleries, clients, or art agencies. -
Engaging with the Art Community
Online communities provide constructive feedback and inspiration. Join groups or forums where you can post sketches, participate in challenges, and learn from other artists. Engagement not only improves your skills but also builds credibility and visibility as a portrait artist.
Sharing online also encourages accountability. Posting regularly motivates you to maintain practice routines and refine your skills while building a following for your art.
Key Takeaways on Drawing Realistic Pencil Portraits
-
Observation is Everything – Learning to see subtle variations in light, shadow, and form is the foundation of realism. The more accurately you observe, the more lifelike your portraits will become.
-
Master Facial Anatomy and Proportions – Understanding skull structure, the golden ratio, and feature placement ensures balance and accuracy. Anatomy isn’t restrictive—it empowers creativity with a solid framework.
-
Practice in Layers – Start with light sketches, block in shapes, refine features individually, then move to shading and textures. Layering prevents mistakes and builds depth gradually.
-
Use Proper Tools and Workspace – Graphite pencils of varying grades, textured paper, blending tools, and ergonomic setup enhance both comfort and quality of work.
-
Shading and Texture are Critical – Gradation, highlights, shadows, and textures such as wrinkles, freckles, or hair flow bring realism to life. Avoid over-blending to maintain natural skin texture.
-
Capture Personality and Mood – Realism isn’t just copying; it’s about expression, emotion, and uniqueness. Likeness is achieved by paying attention to subtle traits and individual quirks.
-
Consistent Practice Builds Mastery – Short daily sketches, long detailed studies, and tracking progress over time accelerate skill development. Mix fast exercises with slow, detailed sessions for balance.
-
Learn from Masters and Modern Artists – Classical techniques combined with contemporary insights expand perspective, enhance technique, and inspire style development.
-
Develop Your Unique Style – Blend realism with creative choices, explore abstract elements, and focus on your artistic voice to produce portraits that are unmistakably yours.
-
Preserve and Present Your Work – Fixatives, proper storage, framing, and online sharing protect your work while amplifying reach and engagement.
Encouragement to Continue Practice and Growth
Mastering realistic portraits is not an overnight achievement. It takes patience, persistence, and a willingness to learn from mistakes. Celebrate small milestones—your first accurate eye, a well-blended cheek, or capturing a subtle expression—and use them as motivation to continue.
Remember, every artist progresses at their own pace. Comparing yourself to others can be discouraging, but focusing on consistent improvement ensures growth. Each portrait you draw, no matter how simple, is a step toward mastery. Over time, your understanding of anatomy, shading, and observation will deepen naturally, and your portraits will radiate both skill and emotion.
Art is both a journey and a destination. Embrace the learning process, remain curious, and allow yourself the freedom to experiment. Your dedication, combined with structured practice and inspiration from other artists, will ensure that your ability to draw realistic faces continues to flourish.
FAQs
1. How long does it take to master pencil portrait drawing?
Mastery varies by individual, but consistent daily practice can show noticeable improvement within months. Achieving professional-level realism often takes several years of dedicated practice.
2. Which pencil grade is best for beginners in portraits?
Beginners usually start with a range of 2H–4B pencils. Harder pencils (H grades) are ideal for light sketching, while softer pencils (B grades) are best for shading and depth.
3. How do I improve symmetry in my drawings?
Use guidelines and grids, draw lightly at first, and frequently step back or flip your drawing to check proportions. Work on both sides of the face simultaneously to maintain balance.
4. Can I draw realistic portraits without studying anatomy?
While it’s possible, understanding anatomy drastically improves accuracy and consistency. Studying skulls, facial muscles, and proportions helps you correct mistakes more effectively.
5. How do I prevent smudging while drawing?
Use clean paper under your hand, avoid touching drawn areas, work from top to bottom (if right-handed), and apply a light fixative once finished.
6. What’s the difference between sketching and realistic drawing?
Sketching is often loose, exploratory, and may lack refined shading or exact proportions. Realistic drawing focuses on accuracy, depth, and lifelike details.
7. Should I use photographs or live models as references?
Both are valuable. Photographs allow detailed study and convenience, while live models teach three-dimensionality, perspective, and subtle shifts in lighting.
8. How can I add depth to my portraits without over-shading?
Focus on gradual transitions, observe how light interacts with planes of the face, and layer values lightly instead of applying heavy graphite in a single pass.
9. What are the best exercises to improve facial proportions?
Practice drawing feature grids, use the golden ratio, study skulls, and do timed sketches focusing on placement rather than details.
10. How do I find my own style in portrait art?
Experiment with line work, shading techniques, backgrounds, and creative elements. Analyze what excites you most, and combine it with foundational realism to develop a distinctive voice.